Tuesday, August 2, 2011
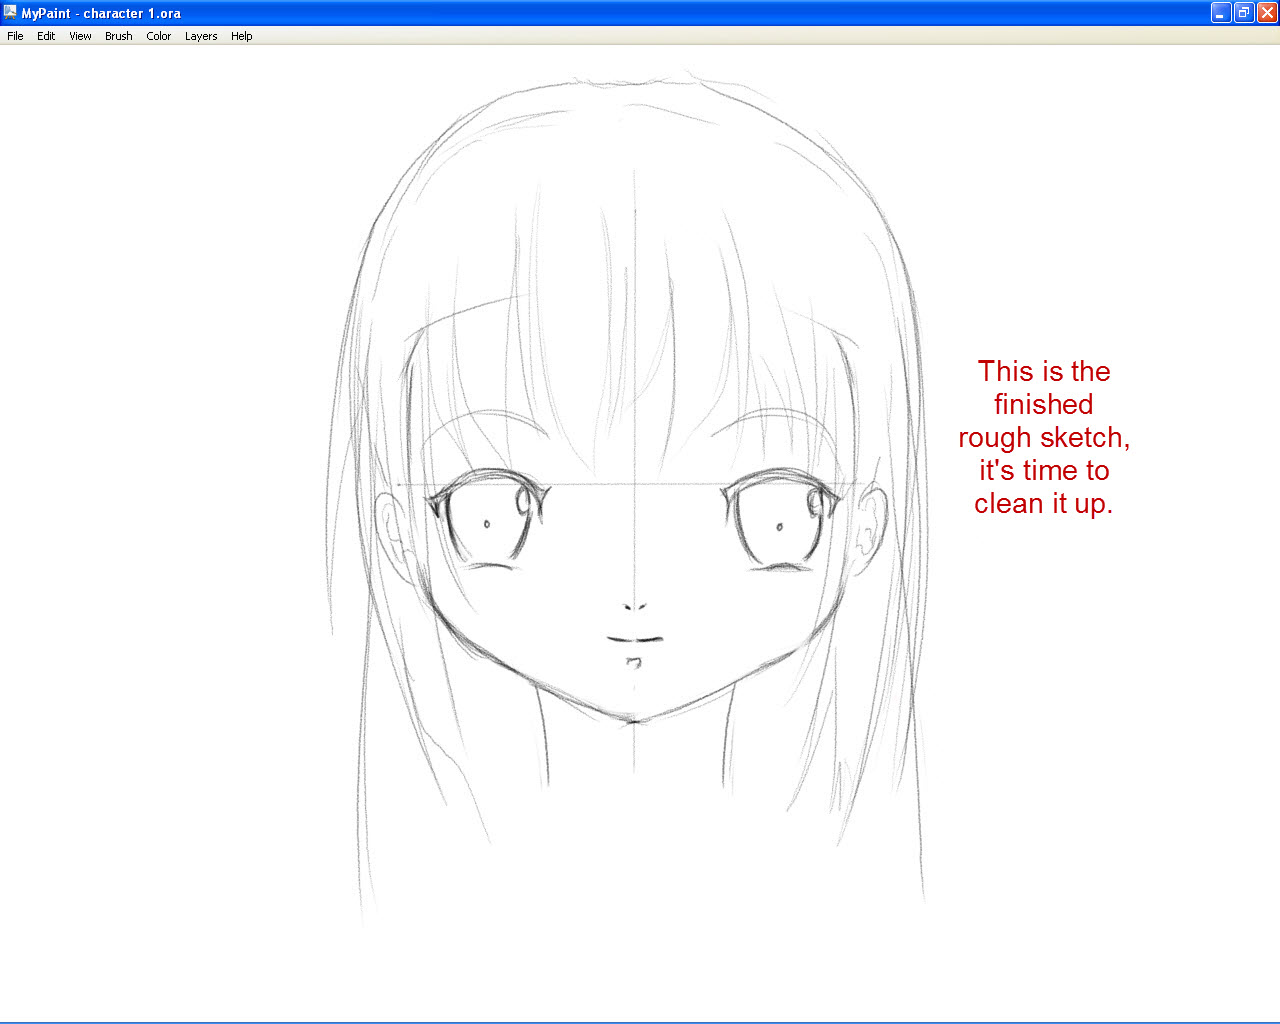
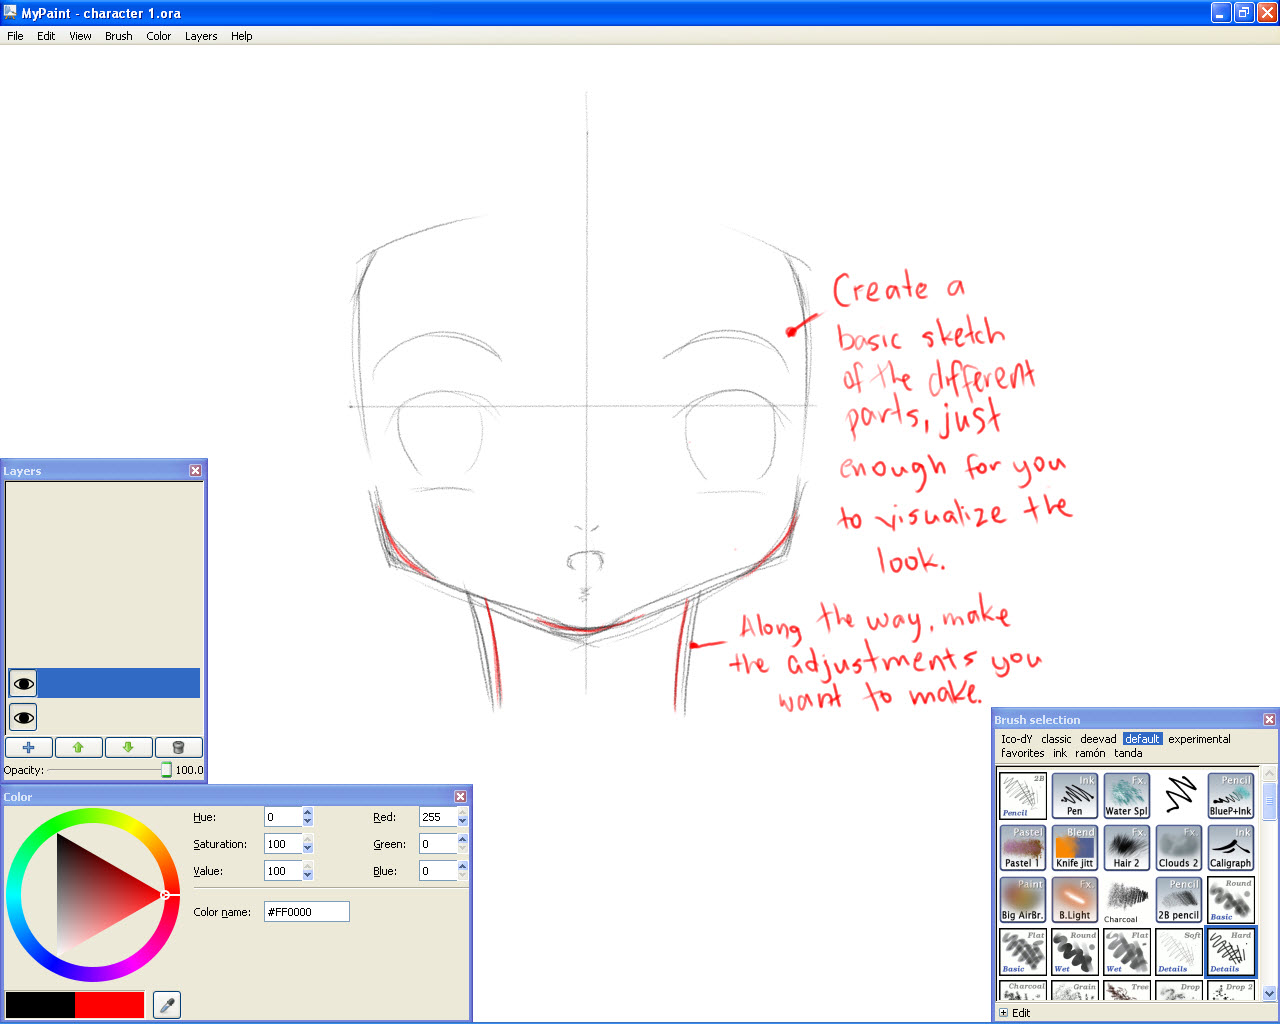
How To Colorizing An Anime Girl. If you have trouble selecting a nice color, then look at other pictures for reference. I almost always use another anime picture to help me. User various colors to paint a colorful picture about a cute Anime girl. How to Color Anime Manga in Photoshop, Coloring, Anime, Draw Japanese Anime, This will make your anime girl's face soft and smooth. just a simple one~ hope u like it, I used colored pencils and Added to queue Drawing cute anime Girl using charcoal!.
So these anime coloring pages should really be called manga coloring pages. (Ai Haibara / Shiho Miyano/ Sherry as a young girl). How to colour in manga and anime style with photoshop. Anime and manga colouring techiniques with photoshop. How to Add Color to Manga & Anime Drawings Basic Anime & Manga Drawing Tips Drawing Chibis Drawing Anime Bodies Anime Women and Girls.
To Coloring An Anime Girl i did the following:

Step 1
He found a free anime style drawing on the net.

Step 2
He opened the picture in Adobe Photoshop and called the plug-in AKVIS Coloriage.
Step 3
He chose colors for every detail of the anime picture using the Pencil tool .
He selected the colors for the skin, hair and lips from the Color Library. Take into account, that when you set color for the face, you should outline the eyes and the lips. Otherwise, the blue of the eyes and the red of the lips will spread to the skin around.
He set two colors for the hair - a dark and a bright one. Besides, the strokes were not straight but zigzag.
He set a number of colors for the flowers in the anime girl's hair.
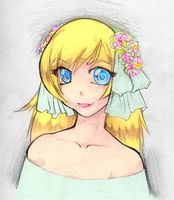
The following image is the result :
Step 4
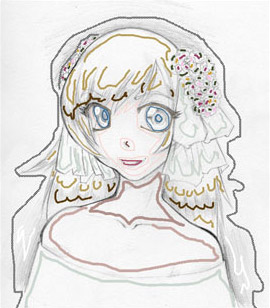
However, the colors of the picture are pale as it is drawn with a pencil on a white canvas. To make the picture more expressive i selected the menu item Image - Apply Image and in the "Apply Image" window he set the mode Multiply for the Blending parameter and pressed the button OK.

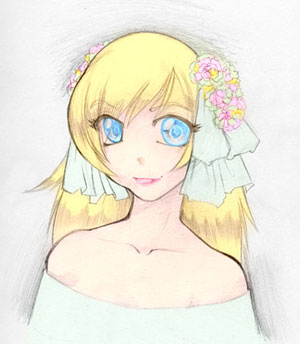
You can use this technique to colorize sketches in manga and anime styles as well as any other drawings.
Tuesday, August 2, 2011 0
Thursday, July 28, 2011
How To Draw Po From Kungfu Panda 1 And 2 With Easy Steps Drawing Tutorial. How to Drawing Po from Kung Fu Panda with Easy Step by Step Drawing Lessons and Tutorials for Kids, Children, Teens. how to draw baby po, kung fu panda step 1 Start the first step drawing out a circle for his big head, how to draw baby po, kung fu panda step 2 Next, draw in the nose, and give baby Po a simple friendly smile. Also Learn how to draw Kung fu Panda and watch Kung fu Panda 2 movie. Kung Fu Panda Po.
Step 6. Learn How to Draw Baby Po, Kung Fu Panda FREE you in easy-to-draw-steps how to draw "How to Draw Baby Po, Kung Fu how to draw baby po, kung fu panda tutorial picture. step 1 picture 1. step 2 picture 2. how to draw step by step drawing tutorials! STEP 1. Begin by drawing a really small circle for the head of Shen, Color him in, and then you have just drawn Lord Shen from Kung Fu Panda 2. Po and his Kung Fu fighting buddies go against the likes of a peacock.
However this episode does have a simple Photoshop tutorial at the end to show how to draw a cartoon dog 1.mp4. Cartoon dog drawing is really easy, too can learn these easy simple steps of how to do cartoon drawing. enjoy!

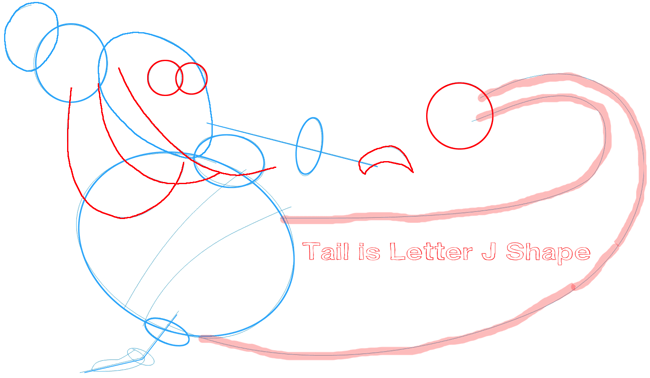
Step 1
Use circles, lines, rectangles and ovals to draw a basic shape.
Step 2
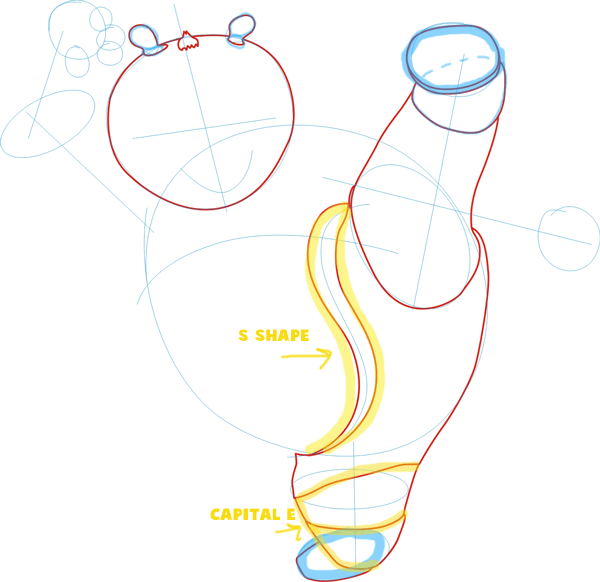
Draw the head, feet, and legs contour first. Draw ovals in the ears and feet. Draw a letter ‘S’ shape around his waist. Draw a capital letter ‘E’ along the bottom of the back leg.
Step 3
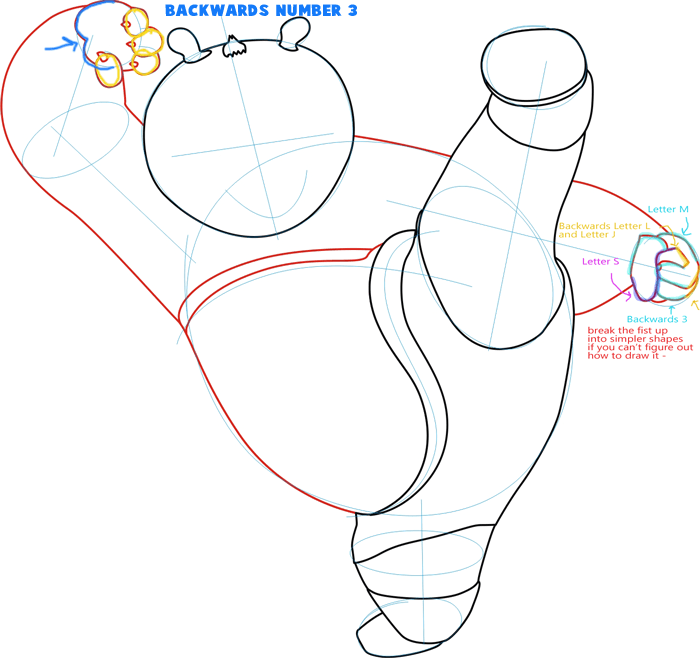
Now, draw body and arms contour. Find simple shapes such as letters, numbers, circles, squares, etc to help you draw things that look hard for you to draw. For example…take a look at home I broke the fist up into simpler shapes….you can do that without my help…just try.
Step 4
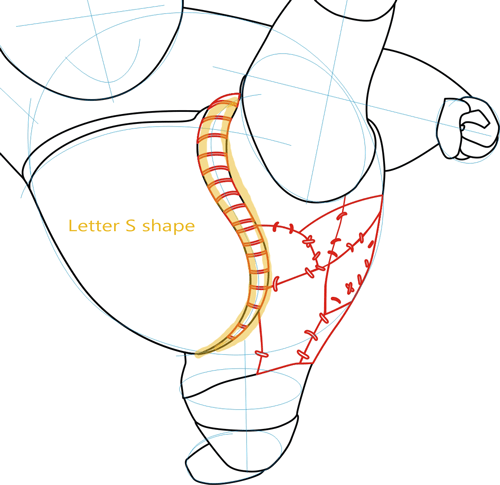
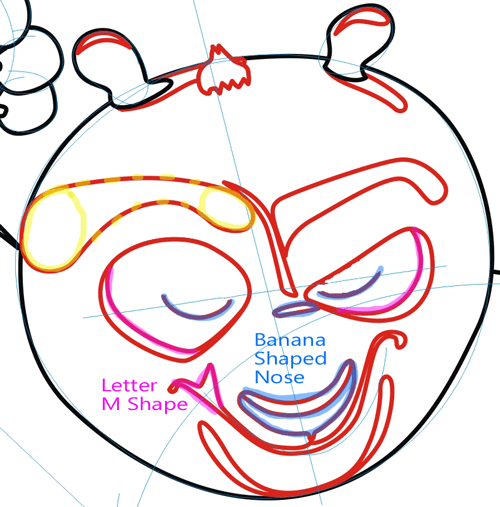
Next, start drawing clothing details…put curved lines in the ‘s’ shaped belt. Draw the stitches and seams on the bottom of his shorts.
Step 5
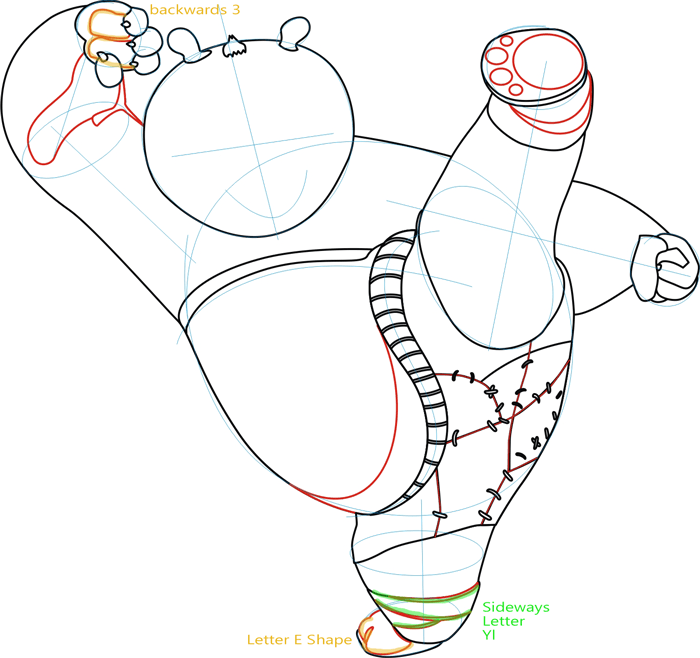
Now, add feet and hands details. Notice the backwards number ’3' in the top hand. Notice the letter ‘E’ shape inside the bottom foot…draw the rest of the details.
Step 6
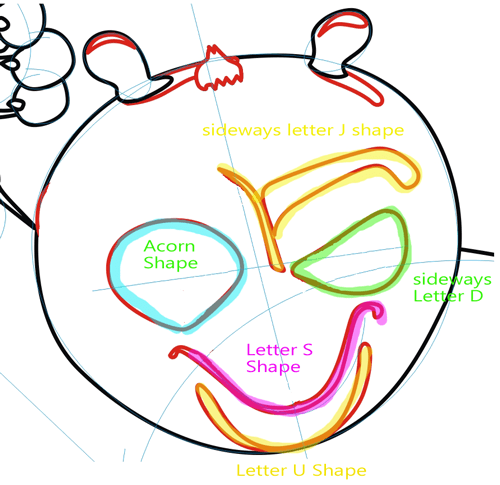
Now lets start drawing the face. Draw a sideways, capital letter ‘J’ for the right eyebrow. Make sure to use the blue guidelines to help you place the facial features in the right spot. Draw a sideways capital letter ‘D’ for the right eye. Draw an acorn shape for the left eye. Draw a letter ‘S’ shape for the mouth and a letter ‘U’ shape for his chin.
Step 7
For the left eyebrow, lightly sketch 2 ovals and then connect them with 2 curved lines. Draw the eyes and the left side of the mouth too.
Step 8

Draw the top of the eye with a downwards curved line. Draw 3 circles for the inside of the eyes.
Step 9
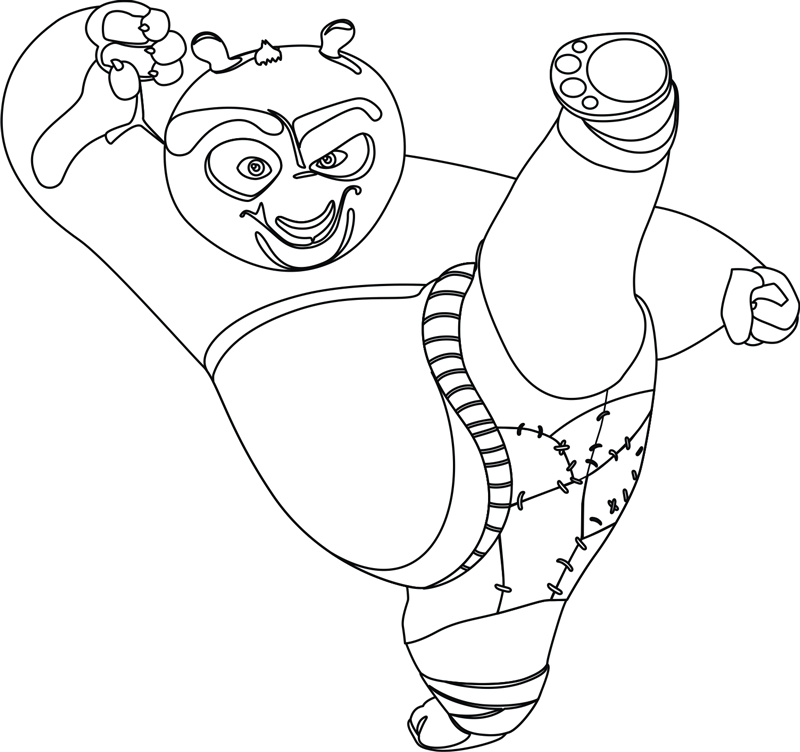
And there it is …your Master Po Ping character, from Kung Fu Panda 1 and 2 is done and ready. I hope that yours came out great!
Finished Drawing

Now colorize your Po from Kung Fu Panda drawing if you want to. I hope that this tutorial helped you that you had a lot of fun.
Thursday, July 28, 2011 0
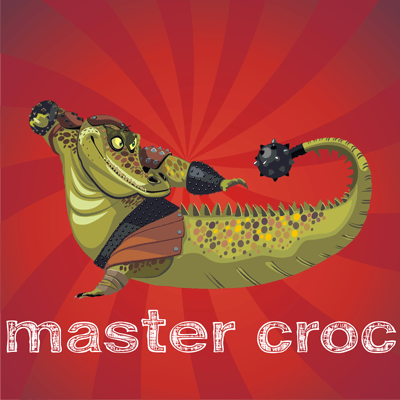
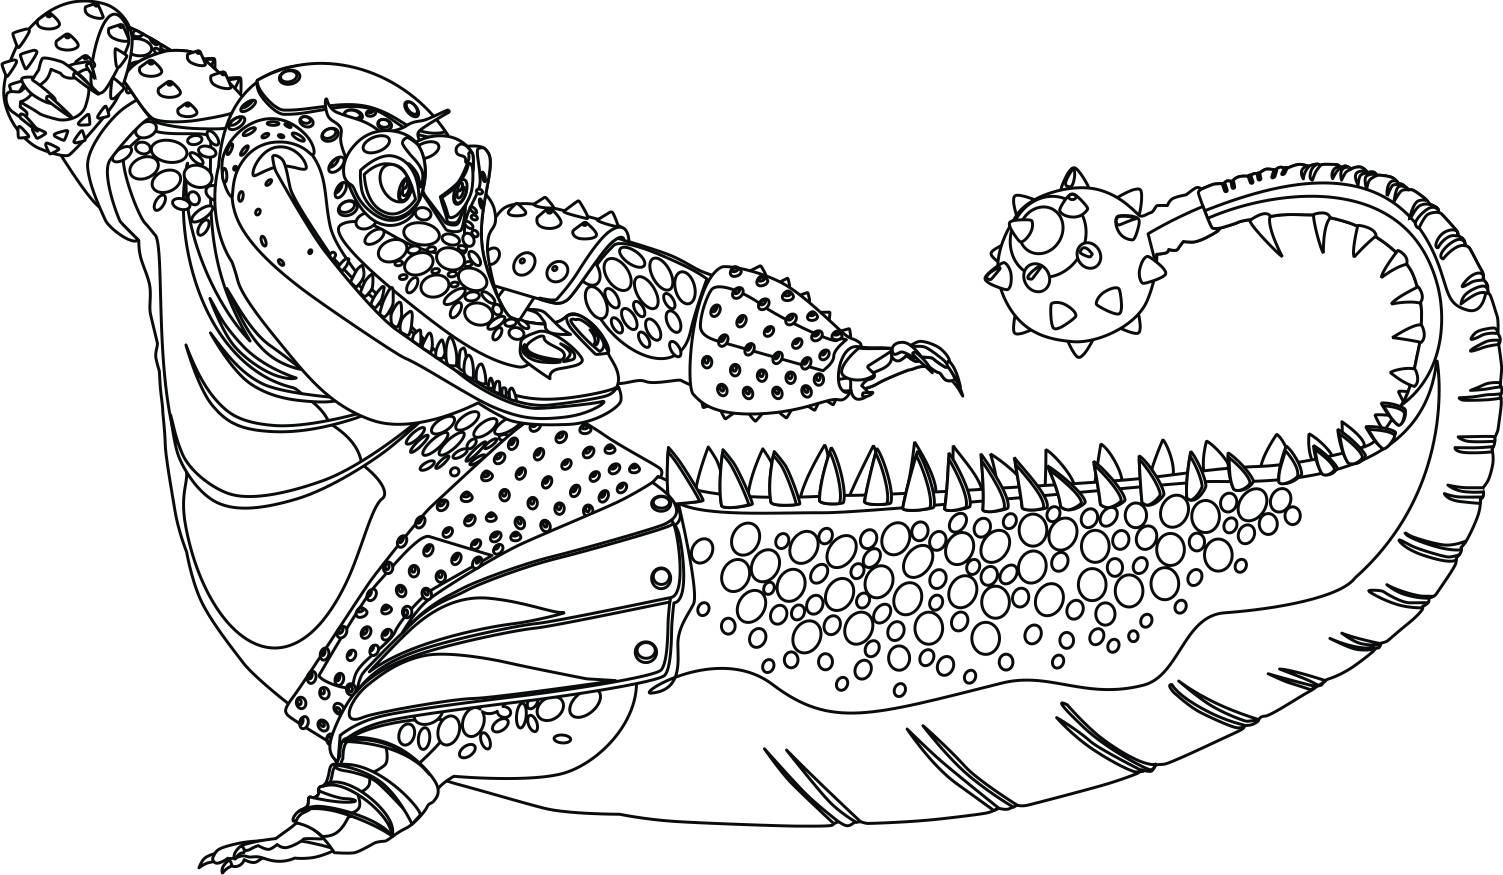
How to Draw Master Croc from Kung Fu Panda. How to Drawing Master Croc from Kung Fu Panda with Easy Step by Step Drawing Lessons and Tutorials for Kids, Children, Teens. Today we will show you how to draw Master croc from Kung Fu Panda. In Kung Fu Panda 2, Monkey continues to provide much of the humor. When they break into the prison to free Master Ox and Master Croc, he offers to stand. Master Croc is a Chinese alligator and a master of Kung Fu. He was the former leader of the Croc. Background Information. Feature films, Kung Fu Panda 2.
So, encouraged with that story, the Kung Fu Panda Master, Po, Van Damme as Master Croc Dennis Haysbert as Master Oxen Gary Oldman as Lord Shen How to Draw Kung Fu Panda Characters. How to Draw Kung Fu Panda Characters. Kung Fu Panda 2 Total Trophies: 44Kung Fu Panda 2 is the sequel to the blockbuster Learn Master Croc's incredible Acu-punch technique. Enjoy leasson draw master croc!
Step 1A
Start off by lightly drawing an oval with 2 smaller ovals on either end of it.
Step 1B
Now draw an egg shape on the upper right side….on the left side, draw a circle and an oval that look like a number ’8' together. On the right side of the egg, draw a line and an oval. Draw a line that looks like a sideways letter ‘v’ at the bottom of the shape from step #1A.
Step 1C
Now draw a few more simple shapes to build up the simple shape of a crocodile.
Step 2
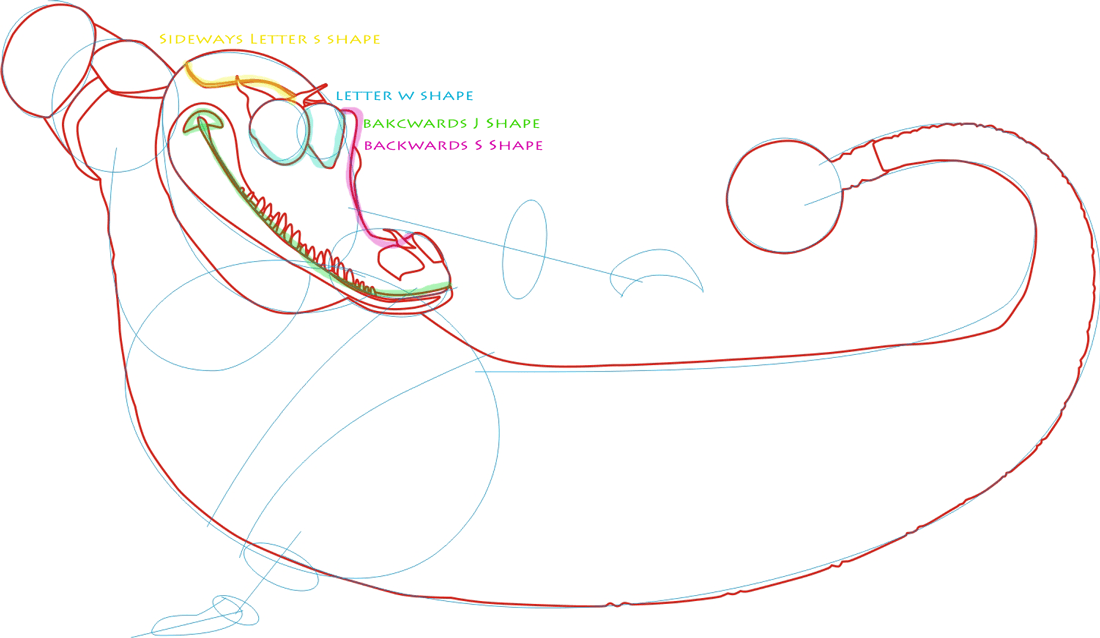
Now, using the guidelines that we drew in step #1, we will start drawing the contour outline of the body, tail, and head. You can see that you can use some basic shapes to help form the features of the face and body.
Step 3
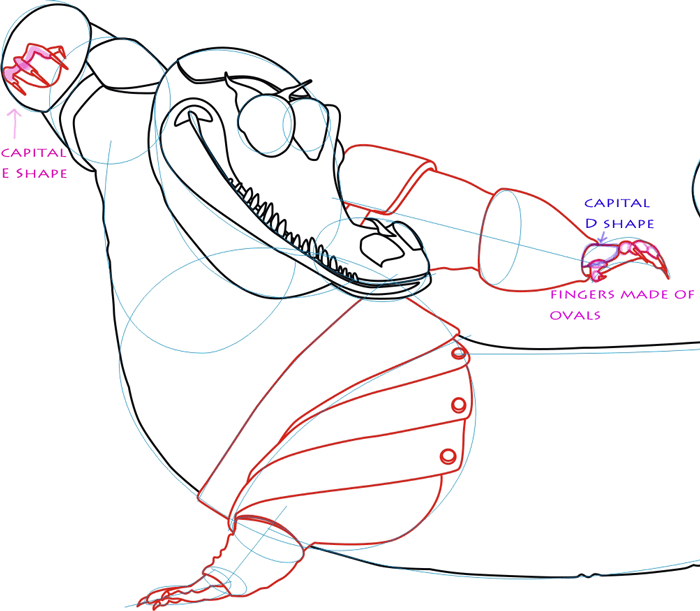
Now draw hands and foot contour. The hands are more like claws. You can use basic shapes to build up these difficult forms.
Step 4
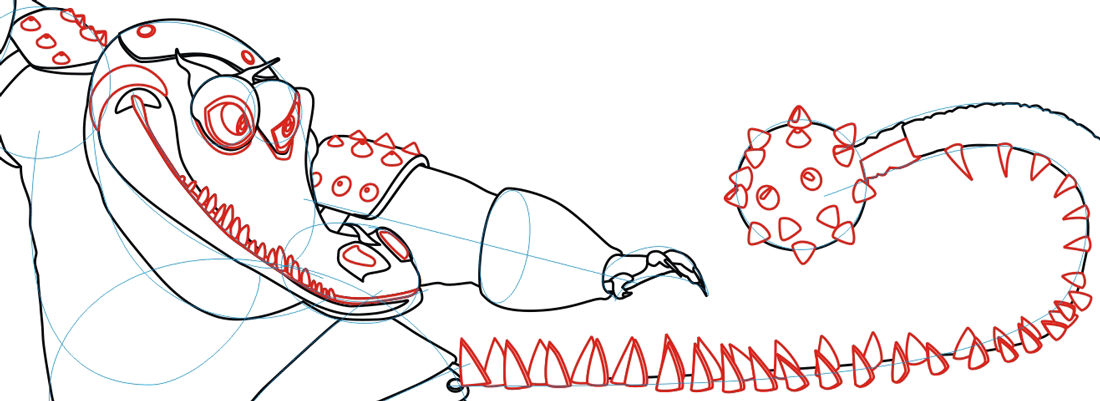
Now, start drawing face, tail and armour details.
Step 5

Add body, foot and tail details.
Step 6
Put some armour details.
Step 7
Finalize skin details.
Step 8
And there it is, you drew master croc … your character is ready.
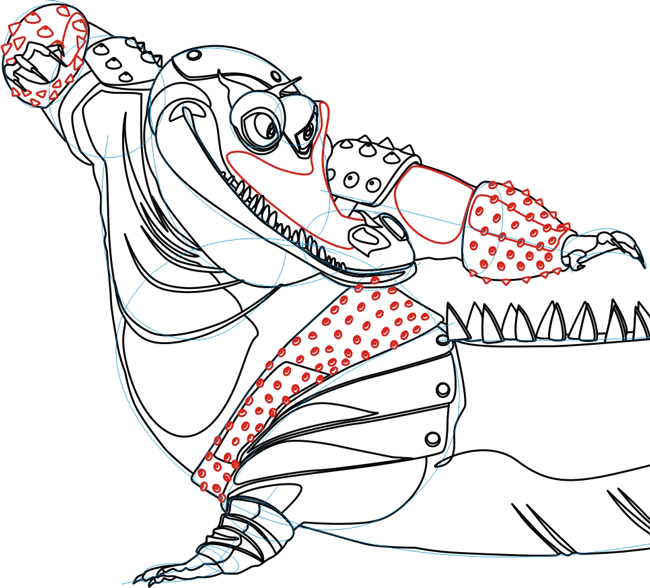
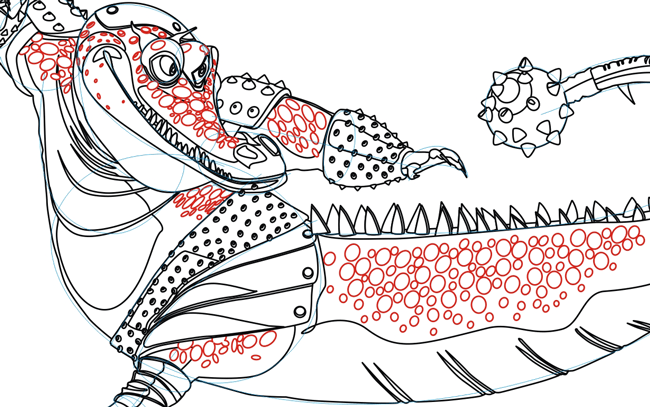
Finished Drawing

Now colorize your Master Croc from Kung Fu Panda drawing if you want to. I hope that this tutorial helped you that you had a lot of fun.
Monday, July 18, 2011
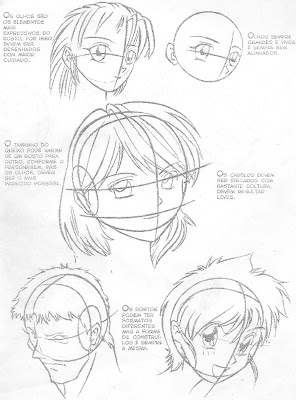
Eyes are maybe the most significant element of an "anime" or "manga" style of drawing (I would say that "big eyes" is what usually comes to mind for the majority of folks when they try to characterize what makes something "anime style").
As with all things, anime art is a stylized interpretation of the regular world, so it helps first-off to be familiar with what you're interpreting (that is, take a good look at a regular human's eyes).
You should have no problem finding pictures of regular eyes, but here's one for now:

- The outline of an eye (created by the edges of the eyelids) is not perfectly symmetrical on the left and right sides or up and down, and has a more complex shape (with curves, folds, and angles) than people often assume in their drawings; and
- Unless someone is looking very wide-eyed, you don't see all of the iris (the colored part), and often not even all of the pupil (the black part). When looking straight ahead, the upper eyelid covers up the top part of the iris, and the lower eyelid comes to or slightly covers the lower part of the iris. Obviously this isn't the case if someone is looking down at their feet or something. The point is to remember that not so much of the white of the eye is generally visible.

To those basics shape you can add detail, and get a basic, regularly drawn eye:


The other thing about eyes and eyebrows is that they are the major way that you convey the emotion of a character (the mouth is the other part, but it plays a much simpler-to-draw, secondary role). Eyes are how you know what someone is feeling (window to the soul and all that). For example, here are three examples: Sad eyes on the top, happy or surprised in the middle (here is where a smiling or wide-open-with-shock mouth would make the difference), and angry at the bottom:

The big thing, however, is the eyebrows--flat or rounded for happy, arched and high when surprised, pointing down with furrowed brow when angry or intense, and curving up for sad.
It is pretty simple to convey emotion with basic differences in eyebrow shapes--just take a look at little internet "emoticon" smiley faces. You've spent your whole life looking at people's faces and expressions, so you are probably pretty good at groking which emotions cause which expressions, but, when in doubt, for ideas look at some anime or manga pictures, magazine or movie still photos, or just grab a mirror--emotion-induced facial expressions are pretty universal, so just make your own.
Monday, July 18, 2011 0
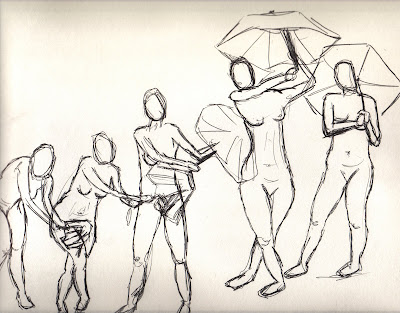

As with faces, the anime- or manga-style body is just an exaggeration of a regular person. The amount you want to exaggerate your figures is up to you and the style you like. Vertically, the main changes are a shorter torso and longer legs. Other than that, you just have to take the features of an idealized woman and make them even more ideal: Long and thin arms and legs (some folks like their legs very long, but it isn't necessary), small body and slim waist (yeah, yeah, and a big chest--but that isn't necessary either), usually the hips are pretty slim, and a long, thin neck. Make sure to keep the head fairly large--the human head doesn't change in size over a lifetime as dramatically as the rest of the body (I'm sure you've noticed little kids have big heads), so the smaller you make the body in proportion to the head, the more "little girl" like your character will be.

Block it out
Contours
Clean up
Now you have the basics of proportion to work with. When you're trying to draw a complicated pose, or elaborate clothes, it can be really helpful to find a picture in a magazine that's close to what you want, or get a friend to pose for you. That way, you can see where one arm crosses the other, or how a leg would look foreshortened from that angle, or whatever. It also makes figuring out how clothes fold or pull a lot easier. Just remember to keep them simple, too: Lots of detail on buttons or zippers is cool, but don't worry too much about getting every wrinkle and fold of fabric--a few simple lines is usually enough. For example, the image below was done based on a picture of a runner in Newsweek; any magazine can be full of dozens of great poses.


