Sunday, June 21, 2009
Let's draw smarter
Do you like this story?
Draw smarter with CorelDraw Tool.
Has anyone ever known you well enough to finish your sentences? Well, that’s sort of how one of the most intuitive drawing tools in CorelDRAW works. The Smart Drawing tool was first introduced in CorelDRAW 12 to give freehand sketching the benefit of a kind of artificial intelligence. You can sketch a shape freehand-style on screen and end up with a precise vector object as a curve, native object or Perfect Shape.
You’ll find the Smart Drawing tool (shown below) located in the Toolbox between the curve tools and the rectangle tools—or you can press the S hotkey for speedy selection.
You can use the Smart Drawing tool with a stylus and drawing tablet, but good mousing skills work just as well. When sketching curves, this tool is capable of automatically recognizing a number of geometric characteristics. For example, two lines sketched side by side can be recognized as parallel straight lines. Sketching rough shapes that have right angle corners can produce precise 90-degree angles, like this:
When drawing native geometric shapes, sketched boxes and squares translate into true rectangles, complete with rounded corner properties that you can apply. Sketched ovals and circles are recognized as true ellipses that you can fashion into arcs or pie shapes if you wish. You can also sketch other complex geometric shapes such as arrows, equilateral and isosceles triangles, diamonds, trapezoids, parallelograms and so on, which translate into Perfect Shapes™, like these:
While the Smart Drawing tool is selected, you can take as long as you need to complete your sketched shapes. But after you’re done, CorelDRAW takes a short time to translate your sketches. To do this, two key options control how accurately shapes are recognized and smoothed. You’ll find these options in the Property Bar (shown below). Setting these interconnected options enable you to control how closely your sketched shapes are translated.
Here’s how the Smart Drawing tool options provide control over recognition and smoothing:
Shape Recognition
This option sets how precisely your sketched shape is matched to a recognizable shape and can be set to one of five levels ranging from Lowest (sketched shapes are not easily recognized) to Highest (sketched shapes are easily recognized), with Medium as the default and None turning the feature off completely.
Smart Smoothing
After your sketched shape is complete, a level of node smoothing is applied in order to make object recognition precise. This option enables you to set that smoothing action, much the same as applying smoothing to a typical path. Choose from one of five options ranging from Lowest (less smoothing applied) to Highest (more smoothing applied), with Medium as the default and None turning the feature off.
These two options work together, enabling CorelDRAW to do its recognition magic. Technically speaking, here’s what the Smart Drawing tool is capable of recognizing using default recognition and smoothing options:
Ovals and Circles – Translate as native ellipse objects
Boxes and Squares – Translate as native rectangle objects
Lines – Translate as curve objects (either straight or curved depending on how they are sketched)
Triangles – Translate as curved objects or as perfect triangle shapes (either isosceles or equilateral)
Diamond – A sketched shape resembling a skewed square will translate into a perfect diamond shape
Parallelogram – A roughly sketched four-sided shape whose opposite sides are parallel and equal will translate into a perfect parallelogram shape
Trapezoid – A roughly sketched four-sided shape that has two parallel sides and two non-parallel sides will translate into a perfect trapezoid shape
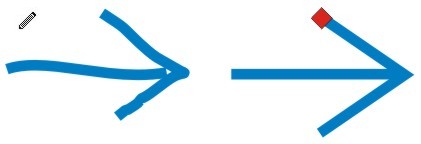
Arrows – Two roughly sketched open paths that resemble an arrow pointing will translate into a Perfect Shape arrow, like this:
To experience the drawing power of the new Smart Drawing tool, try these quick steps:
Choose the Smart Drawing tool (or press the S hotkey) and use a click-drag action to sketch a square or rectangle. Aim to keep the sides of the shape vertical and horizontal as you draw. After releasing your mouse button, CorelDRAW automatically translates your sketch into a rectangle shape, like this:
Choose the Pick tool and check your Status Bar display. The shape you sketched is specified as a Rectangle, and the Property Bar features options associated with shapes created using the Rectangle tool, including the rounded corner options.
Choose the Smart Drawing tool again and sketch an oval or circle. Aim to keep the shape oriented either vertically or horizontally. When releasing the mouse button, CorelDRAW translates your sketched shape into an ellipse, like this:
Choose the Pick tool and check your Status Bar. The shape you sketched is specified as an Ellipse and the Property Bar features options associated with shapes created using the Ellipse tool, including Ellipse, Arc and Pie states.
Perfect Shapes and Glyph Nodes
Since certain shapes you sketch can be recognized as Perfect Shapes (such as triangles, trapezoids and parallelograms), it may help to know a little about these specialized objects.
Sketched shapes that are recognized as Perfect Shapes are the same as the ones you would typically draw using the Perfect Shape tool. But these Perfect Shapes each feature unique “glyph” nodes that can be manipulated to change their proportions while preserving certain aspects of their shape. For example, the shape representing a triangle features a single glyph node that enables you to set one of the angles but keep the overall symmetry of the shape.
You can edit glyph nodes similar to the way you alter the control points on a polygon. As they’re moved, glyph nodes have the effect of resizing, changing proportion or dynamically moving a certain aspect of the shape.
For some hands-on experience creating a Perfect Shape with the Smart Drawing tool, try these steps:
- Using the Smart Drawing tool, sketch the shape of an isosceles triangle (a three-sided shape with two equal angles). On releasing the mouse button, CorelDRAW translates your sketch into a Perfect Shape, complete with a glyph node, like this:

- Choose the Pick tool and check your Status Bar. The shape is identified as a Perfect Shape. Use the Shape tool next to click and drag the glyph node (the red marker) to alter your shape’s proportions. The triangle changes shape with the two angles constrained to equal measures, as shown here:

- You can edit glyph nodes interactively using the Shape tool (F10), but you can also edit them using the Object Properties docker for a selected Perfect Shape. To quickly access these options, press Alt+Enter to open the Object Properties docker and click the Perfect Shape tab, shown here:

Smarter Drawing Tool Functions
There are two other aspects of the Smart Drawing tool that you may find useful. The first involves controlling the delay time interval between the moment you finishing sketching a shape and the moment CorelDRAW determines a recognizable shape. By reducing this delay time, you can sketch several separate lines or shapes in succession and CorelDRAW will recognize them as a single compound path. For example, if you finish sketching a complete shape, then begin sketching a second shape within the time delay interval, the two shapes will be recognized as a single object.
Access the option that controls time delay by double-clicking the Smart Drawing tool button in the toolbox to open the Options dialog. The Drawing Assistance Delay slider (shown below) can be set between 0 and 2 seconds. The higher you set the delay time, the more time you’ll have to keep drawing. If you’re accustomed to quick sketching, a lower delay time will make your sketching sessions more productive.
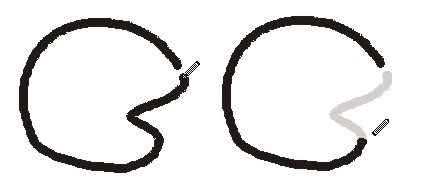
While using the Smart Drawing tool, you can also correct your sketched shapes on the fly to improve the accuracy of your drawing. As you sketch your shape, temporarily hold Shift as the modifier key to interactively erase your drawing path in reverse. As with other drawing tools, ifyou hold the Shift key the Smart Drawing tool cursor will invert and enable you to interactively terase your sketched lines (shown below) by tracing the portions you don’t want. Releasing the Shift key enables you to resume your sketching operation.
The new Smart Drawing tool is one of those truly innovative tools that pop up every so often. If you work in a creative field such as design or illustration, or a planning industry such as industrial design, engineering or architecture, the Smart Drawing tool enables you to harness the power of this new software intelligence. You may just find yourself reaching for it the next time you start a new CorelDRAW drawing project.

This post was written by: beemagnet77
BeeMagnet is a professional graphic designer, web designer and business man with really strong passion that specializes in marketing strategy. Usually hangs out in Twitter has recently launched a blog dedicated to home design inspiration for designers, bride, photographers and artists called HomeBase


0 Responses to “Let's draw smarter”
Post a Comment